설명
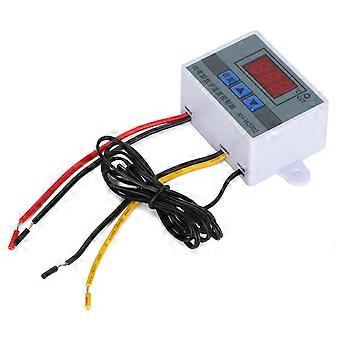
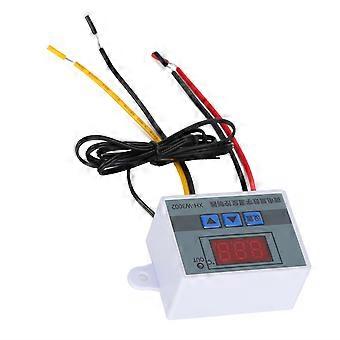
XH‑3002 Microcomputer Digital Temperature Controller Hatching Temperature Controller
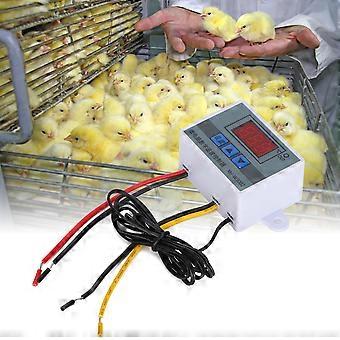
1、A variety of fields perfect use, convenient operation and practical settings, is your side temperature control housekeeper.
2、It is precise and reliable with good long‑term stability. Convenient for install and fixed. Small size, low power consumption, fast response.
3、Easy operation, to set start temperature, stop temperature, corrected temperature connector and so on.
4、Suitable for hatching, breeding, air and water temperature control and other related temperature detection and control.
5、Specifications are optional, precise temperature control, temperature calibration.
1 x
Temperature Controller
ItemType: Digital Temperature ControllerMaterial: PlasticWeight: Approx. 51g /
1.8ozOperating Voltage Specifications: 12V, 24V, 110-220VAccuracy Level:
0.1Temperature Measurement Range: -50-110 (℃)Temperature Measurement Accuracy: -15-65 (℃)Humidity Measurement Accuracy: 1 (RH)Temperature Measurement Error: ±1 (℃)Applicable Environment: -15-55℃ / 20%-85%RHProduct Embedded Hole Size: 73mm /
2.9in, Hole Diameter (φ4mm)How to use:
1. Press the setting button once to enter the internal menu, the default display is P0, press the setting button again, and set the required starting temperature through the up and down buttons.
2. Press the setting key once to enter the internal menu, the display is P0, switch to P1 through the up and down keys, press the setting key again, and set the required stop temperature through the up and down keys.
3. Enter the internal menu in the same way, switch to P2 through the up and down buttons, press the setting button again, and set the required calibration temperature through the up and down buttons. (Note: In the setting, if the detected temperature value is
0.5°C larger than the actual temperature value, then the calibration temperature that needs to be set is -
0.5°C. If the detected value is 1°C lower than the actual temperature value, the calibration temperature that needs to be set is 1°C. Detection temperature + Correction temperature = Actual temperature.)
4. Enter the internal menu in the same way, switch to P3 by pressing the up and down buttons, press the setting button again, and set the required delay time through the up and down buttons in minutes. (Note: Delayed start is generally used for compressor refrigeration. If it is used for refrigerators and freezers, this value needs to be set. According to the compressor back pressure, the general setting value is 3-6 minutes. If you are not used for control or no delay function is needed, just skip it.Temperature control mode
1. Setting essentials:Start temperature <stop temperature (the program automatically judges that the working mode is heating mode)
2. Setting method: press the setting key to enter the internal menu, set the start temperature through the P0 value, and set the stop temperature through the P1 valueUse case: Control the water heater, stop heating to 50°C, and start heating again when the temperature returns to 40°C, how to set it?
1. Make sure that the working mode is heating mode, starting temperature <stop temperature.
2. Press the setting key to enter the internal menu, select P0 to start the temperature and set the P0 value to 40°C.
3. Press the set key to enter the internal menu, select P1 to stop the temperature and set the value of P1 to 50℃Cooling mode
1. Setting essentials: start temperature> stop temperature (the program automatically judges that the working mode is cooling mode)
2. Setting method: Press the setting key to enter the internal menu, set the start temperature through the P0 sets the stop temperature through the P1 value.Use case: empty cabinet radiator, heat dissipation stops at 26℃, and the temperature rises to 30℃ to start the radiator again, how to set it?
1. Make sure the working mode is cooling mode, starting temperature>stop temperature.
2. Press the setting key to enter the internal menu, select P0 to start the temperature change and set the P0 value to 30°C.
3. Press the setting key to enter the internal menu, select P1 to stop the temperature and set the value of P1 to 26℃.
-
브랜드:
Unbranded
-
카테고리:
물고기용품
-
Fruugo ID:
352887947-768228625
-
EAN:
9349522363882